"I think I know what we are going to do today Mom"
I am a mother of two rambunctious boys ages 9 and 2. I also have a chronic autoimmune disease which has changed my life around. I cannot do the things I used to. I do not want my kids to feel like they miss out on things. We have been using Pinterest frequently. It is a treasure chest of inspiration. We pin and pin and pin! Then they sit there....on the bulletin board. These great creative ideas that scream at me and make me desire to be more creative! I think I can do that! I cannot do a lot of things but I can do some things! I just have to change some! I am not working currently due to the disease. This summer I want to make fun! I want it to be one they remember! So...our goal is to take one of the creative ideas we have pinned a day and complete it. A pin a day. This can be a little one, a big one, just something to break up the summer days and do things that we normally would not! We can do it! These ideas are from the creative minds on pinterest and we hope you enjoy them! 86 days of Summer!!!
Showing posts with label toddler activities. Show all posts

Saturday, July 14, 2012

Homemade Binoculars

Simple craft today! Kids love looking through Pop Pop's binoculars, so we decided to make some! The boys are out hunting in the yard now looking for Big Foot, Bad Guys, Birds and Bugs. I like that something soooo easy can keep them busy and get their imagination running!

Homemade Binoculars Items Needed:
2 toilet paper rolls
tape
string

We just used paint tape and duct tape to decorate. You can have them decorate them or paint them if you want! Tape them together. Add a string or shoelace for them to wear around their necks and let them go!!! You can even tie this into the earlier scavenger hunt post and pair them up together! Have fun! We hope everyone is enjoying the posts and projects!


Sunday, July 8, 2012

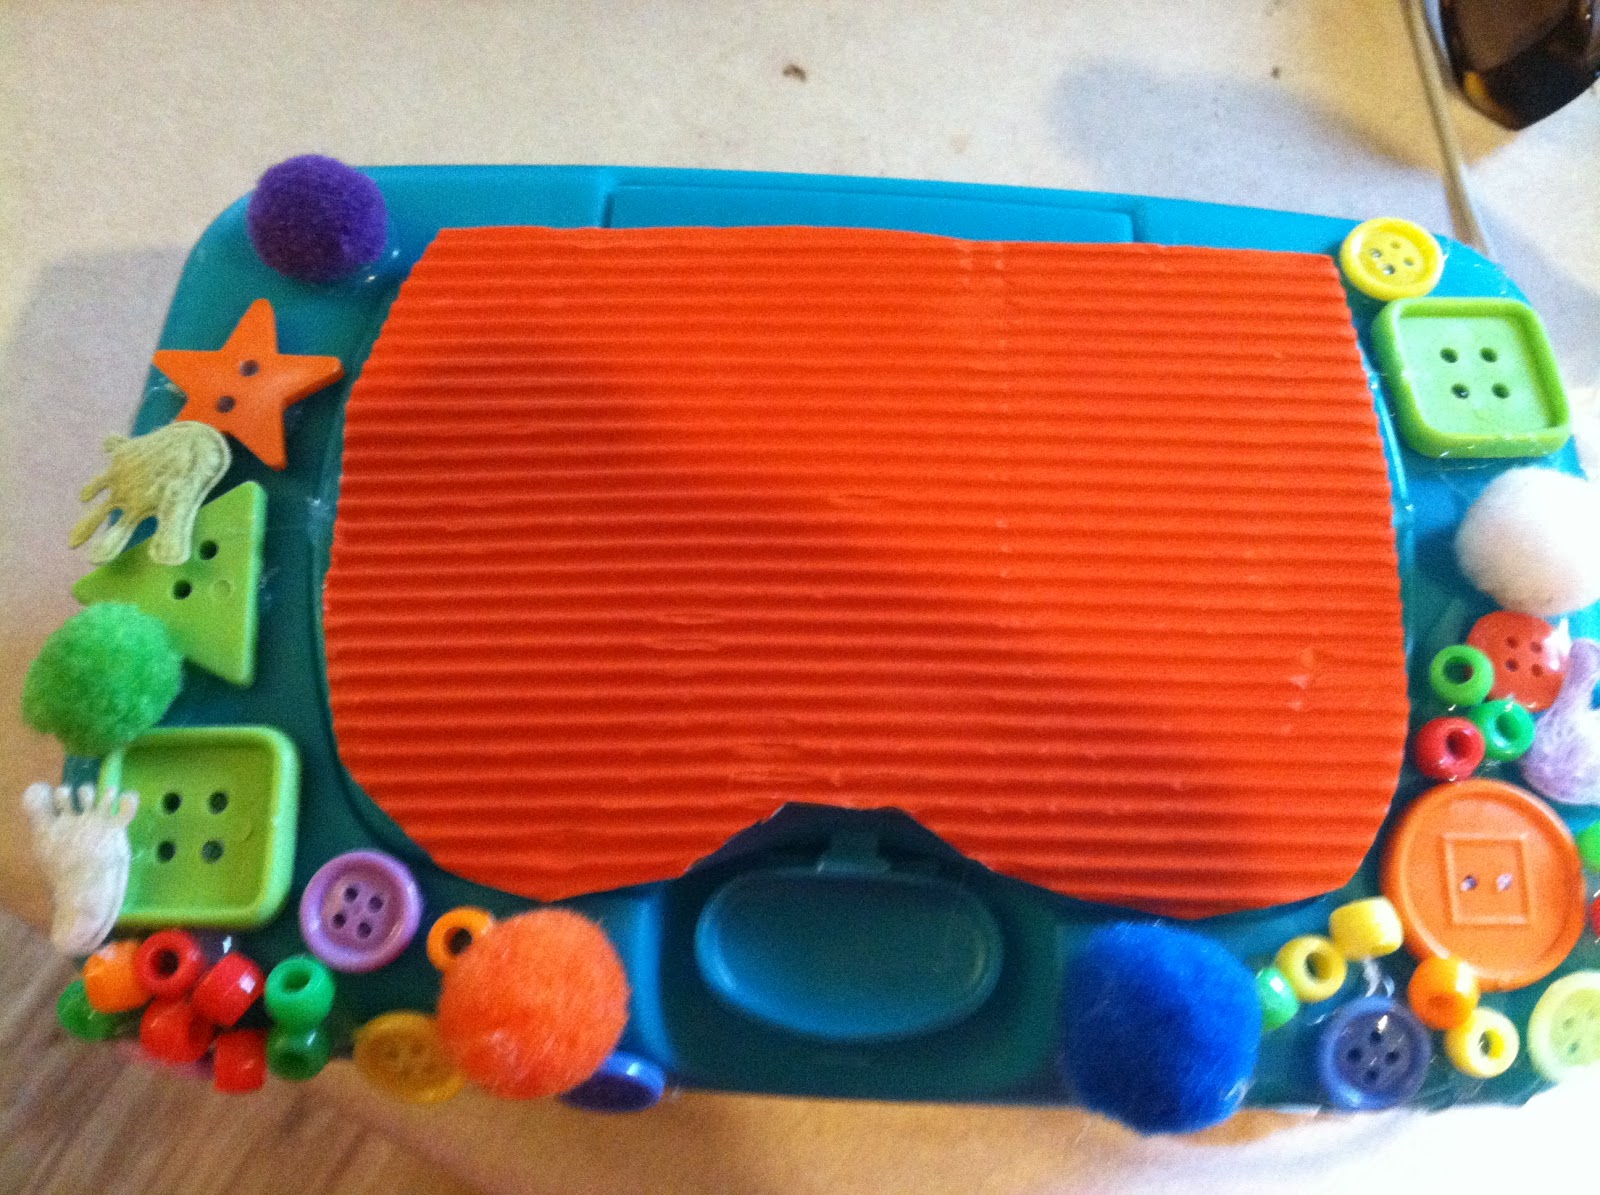
Toddler Wipes Toy

I am not sure about other moms, but wipe containers are available in my house most of the time! I also have a 2 year old that seems to love to pull the wipes out of the containers one at a time. I catch him in the act at least once a week. Other times I will find wipes all over his room. We are in the process of making our own wipes, and doing research on them but thought this would be fun for him! We had Everything on hand and cost us nothing! I will continue to switch up the fabric and add different kinds, textures, and colors. Not sure what to call this but:

TODDLER WIPES TOY ITEMS NEEDED:
Empty wipes container
craft supplies to decorate (I let my 2 year old pick out what he wanted)
Glue Gun
Fabric (we used old clothes that had wholes and cut rectangles out of them)
We started by giving Callen the items he could choose from to glue on. This itself took 30 minutes as he is not used to being able to root through the craft bins. H likes all the bright colors of course. I used the glue gun where he told me to and he pushed them on except for the small beads as they are little I did not want him to get hot glue on himself. He dropped them on and I pushed in. We used some sparkly sticker paper and ribbed paper for different textures. He likes to strum on the ribbed top. Next we went to the scrap bin and found different textures of fabric to put in there. Fleece and Sweats were his favorite. We tied some together like a clown handkerchief and left some separate! This was a hit. I am not sure if he loves it as much as real wipes but he has fun with it! He now carries it around and shows everyone his magic. If he starts to go for his wipes in the bedroom I grab this one and give him it. I am pleased with this one! 


Tuesday, July 3, 2012

Sponge Fights!

This is a great project and saves my fingers and time! It has been floating around pinterest and we have been waiting to try it! Great Water Balloon Alternative!


I bought a pack of 6 sponges from the dollar store. Cut them in thirds. Zip Tied the middle! Soak with water and throw! Lots of fun with this one! We will be making more!! No tieing of balloons, no picking up scraps for a week, the kids can pull them out themselves! Whooooeeeee FUN!

Monday, June 25, 2012

Homemade Bird Feeders

We are still up in the mountains so we decided to do a homemade bird feeder. Carter was a little disappointed that we were not actually making one out of wood but I promised him he could make something tomorrow using a drill, hammer and wood. He was ok with this. We found this on pinterest and now I cannot find it to post the link but it was easy and I think it was a hit!

BIRD FEEDER
Items Needed:
Empty Toilet Paper Roll
Birdseed
Peanut Butter

Take the toilet paper roll, have the kids spread Peanut Butter all over it and then roll in birdseed, sprinkle and fill the gaps! Then simply hang it on a branch! No rope needed!


Such Concentration!


Callen had a lot of fun sprinkling the birdseed on the peanut butter. He was very interested in how it felt. We checked on it and the blue jays are eating it! Every time I try to take a picture of the Jay though he leaves when he hears me approaching! Great Project for a 2 year old! Carter did the peanut butter and Callen did the seed. Great Team!! :
Finished Feeder!

Water painting for toddlers!

Ever painted with a 2 year old? Highly stressful. We were painting rocks today thinking of making monster rocks or angry bird rocks when my 2 year old got mad and through his brush full of black paint. We had a towel down but I was still letting him know we don't throw and that now he has to watch us. He then decided to throw the paints, which we all connected of course. Ugh.
Now both boys are crying and unhappy. I am feeling overwhelmed and frazzled when I remembered a pinterest toddler activity of painting with water. I skipped over it before because I never thought he would enjoy it but I figured it would be worth a try.
I gave callen the dog bowl full of ware and a sponge brush. He painted the deck and was extremely pleased with himself. This made it able for me to pick up, get Carter a different set o paints and get him started. Callen enjoyed it for an hour! Wow! He even went back to it on his own this evening! Another great idea! So, don't doubt the activities you find from at home moms, home schooled moms etc...they know what works!!! :) it saved me, my boys and my sanity!

Saturday, June 16, 2012

Giant ice cube fun!

We had been waiting for a warm day for this one! It is AWESOME! We found it on pinterest with this link http://www.crumbbums.com/?p=2476 It was a surprise for the boys, I made them and surprised them with little treasures in them!

I used foil pans from the dollar store and food coloring and made 3 levels of ice each with little plastic animals also from the dollar store including fish, shark, gators, and even little compasses which Carter was excited about and immediately launched into pirate land and finding treasure! Such imagination! I love seeing their faces light up with excitement! The kids and even the dog had a great time with these! They tried to figure out the best way to get the treasure out and tried a hammer (kids one) warm water, salt, rocks, an decided the best was dropping it over an over so chunks broke off and let out some aggression! I immediately refilled them with other treasures from the house an they are in the freezer for the next time! Quick, easy activity that kept the kids cooled off in the summer an busy having fun with each other for over an hour! Recommend!
CALLEN CHECKING IT OUT AT FIRST
EVEN THE DOG HELPED!

Fizzy Friday Fun!

Time for some Fizzy Fun! 20 Days! Carter really likes the exciting projects like explosions, fizzy, totally boy activities. I have been waiting for a rainy day to do this one we found pinterest.com about fizzy bubbles.

FIZZY FUN
ITEMS NEEDED
TUPPERWARE
BAKING SODA
FOOD COLOR
VINEGAR
EYE DROPPER OR MEDICINE SYRINGE


Fill bottom of Tupperware with baking soda. Mix vinegar and food coloring in separate container. Have kids fill droppers and drip the solution into the Tupperware. Bubbles, fizziness and fun! I love Callen's tongue sticking out in serious concentration. It was a good motor skill lesson for him as well learning how to hold the dropper and push it so the colors came out. I got shot a couple of times! Great fun! Only takes 10 minutes to set up! Both boys were sad when they ran out of their mixes! Really easy project with instant results for fizzy noisy fun! Carter and I talked about the reaction and he remembered using the same ingredients in school while making his volcano...that will be soon I am sure. I think I will hit the mentos trick for him also soon!

Friday, June 15, 2012

Colored rice sensory box

Again, I never thought my 2 year old would enjoy a simple little tote of things, he still loves his construction box and plays with it for at least an hour a day. He will ask for it and play independently with it which is huge in my house! This box was for both boys as Carter got the fun of coloring the rice different colors and finding what he wanted to put in it for his brother. He is proud of it.
To color the rice just food color an let dry. Carter put some weebles, a helicopter, a spoon and a few recycled k-cups to scoop and fill.


Callen was a little confused about the feel and texture of the rice but got into it! Carter buried things and told home to find them. Another hit with Sensory Boxes! Going to do an ocean one but that is for outside! :) 18 days down! I have to admit it is harder than I thought! We do plenty of things but there are days when I don't feel like doing any! The good thing is it keeps me motivated to get an activity done and good for the boys. We have been working on some other projects as well and will have some good posts coming up!!

Wednesday, June 13, 2012

The Stache and bouncy balls


We LOVE moustaches! We simply printed up stache pictures and glued them to a stick. The kids loved it when I sang and talked to them with it on! Carter liked to chase his brother of course and we all laughed at each other! Carter woke me up this morning with the little one on and talking funny. They were quick easy and a riot!!! IT IS A MUST DO! How can anyone not appreciate the STACHE.


We also made bouncy balls. There is a pinterest post on this, however, I went with the easier version when we happened to come across a Rose Art Super Ball kit on sale at walmart for $3.00 when we picked up some glue sticks for future project.
Both boys love to play with bouncy balls. Now they get to make them! Highly recommend the kit!
Super Easy. Has ball mold and colors. Each ball only took 2 minutes to do, and 20 minutes to rest. We made 4 balls and still have more left over. They bounce well and make my boys smile. That is what it is about. Good day with lots of smiles and laughter. Hope your day brought joy as well!

Tuesday, June 12, 2012

Construction Box

I always see sensory boxes for kids on www.pinterest.com so I decided to try one and see what my 2 year old thought. We chose the construction one with small rocks. I did not search high and low for construction trucks just added any trucks I found in the first crate I came too! :)
CONSTRUCTION BOX
ITEMS NEEDED:
BOX OR TOTE
SMALL PEBBLES OR ROCKS (I opted for small rocks as he is less likely to eat them)
TRUCKS BULLDOZERS, CARS ETC
SIGNS
SPOON OR SOMETHING THEY CAN DIG WITH


Callen loves it! He bury's the trucks, puts rocks in them, digs with the spoon and is pretty neat with it. He puts the lid on it and puts it in it's home and brings it out when he wants to play with it. Super cute and I had no idea this idea would work! Will do another. I liked the ocean one too.... Another success thanks to all the creative peeps on pinterest!

15 Days! Bath Paint Fun!


 We love bath time activities! This one had a duel effect as it cleaned the boys and they had fun! Great Pinterest Idea!


HOMEMADE BATH PAINT
ITEMS NEEDED!
BABY SOAP (LIQUID)
CORN STARCH
FOOD COLORS

THAT'S IT! PUT SOME CORN STARCH IN ADD THE FOOD COLORING AND FEW SQUIRTS OF SOAP AND STIR, ADD SMALL AMOUNT OF WATER UNTIL CONSISTENT WITH PAINT! 

Callen loved to color himself more than the walls! This is great
as it is soap! :) He had such a great time when it came to my 9 
year old's turn to shower  he insisted that I make him some as 
well! He would not let me take pictures but he had more fun
coloring the walls! Comes off easy! Lots of fun with this activity!


Sunday, June 10, 2012

MELTED CRAYON ART

I know everyone has seen the melted crayon art circling around pinterest. We decided to give it a try with some tweaks. First, we used a cardboard box for round one as Canvas is expensive and want to wait until we had it down before using it! Second, we taped the letter C in Carter's for his room.

All you see on pinterest is the beautiful perfect ones. I am posting this as I am sure many moms have tried it and not got those results! I am glad we did a trial run and it did not turn out! We will retry because we really liked it though!

THINGS NEEDED:
GLUE GUN
CRAYONS
CANVAS (WE USED CARDBOARD FOR TRIAL RUN)
HAIR DRYER

Glue the crayons to the top of your board. Let dry! Then take blow dryer and melt the crayons!

TIPS:

  •  NOT TOO MUCH GLUE AS IT MELTS THE CRAYONS
  • DO NOT MOVE CRAYONS AROUND ON GLUE AS IT BREAKS THE HOLD
  • BLOW FROM THE TOP FOR STRAIGHT DOWN CRAYON ART (CARTER LIKED TO BLOW STRAIGHT ON AND THE COLORS MIXED TOO MUCH)
  • PUT LIKE COLORS BY EACH OTHER MAKING A BLOCK OF BLUE, A BLOCK OF RED ETC...THIS WILL MAKE THE COLORS POP OUT MORE!
  • BE PREPARED TO HOLD THE HAIR DRYER, CARTER'S ARM GOT TIRED AND WE HAD TO KEEP SWITCHING 
  • PUT NEWSPAPER UNDER SO YOU WILL NOT BE SCRUBBING THE COUNTER LATER


HAVE FUN! REMEMBER IT DOES NOT HAVE TO BE PERFECT! THE POINT OF IT IS TO SPEND TIME WITH YOUR KIDS AND TEACH THEM CREATIVITY AND EXPLORE!!


Saturday, June 9, 2012

Day 13 Tornados and Magnets

Today I decided to do some science fun with the boys. Tornado's and Magnet fun.

TORNADO IN A JAR
THINGS NEEDED:
JAR
WATER
DISHWASHER SOAP

Really simple! Fill the jar leaving about an inch on top, add one TINY drip of soap and SHAKE IT UP.
Hard to get a photo of this one it is too fast. Carter enjoyed trying it, we had to keep dumping it and re-doing as once you get a good tornado out of it, it is too foamy to do again. We had races to see whose lasted the longest and the best one. Kept them busy for ohhh 15 minutes! LOL!

PIPE CLEANER MAGNET PLAY
THINGS NEEDED:
PLASTIC JAR
PIPE CLEANERS
MAGNET

The boys are still playing with this one a day later! Cut up the pipe cleaners and place in empty PLASTIC jar. Seal and take magnets and place on sides moving them around! The boys had fun playing tag, trying to steal the cleaners away from them and seeing who could get the most! They woke up this morning and grabbed it and messed around with it while watching cartoons! :) FUN!


Tuesday, June 5, 2012

Home Made Air Dry Clay! Day 10!

Hello! I am running a bit behind on entering the posts! So little time by myself! :) Carter uses clay in art class and really enjoys it. He has been begging to make it. I decided on the air dry kind thinking it would be less work! It probably was but takes a lot longer to dry! It has been 24 hours and they are still not dry! Carter made father's day presents for Mike (a worry stone and ball) a snake for himself, vitamin holders for 2 Grandpa's and a cigar ashtray for the other one! We will paint when it drys enough and repost!
We found the recipe via pinterest at http://www.homeschooling-ideas.com/how-to-make-clay.html#airhardening


Air Hardening Modeling Clay


Baking soda and cornstarch make a smooth, pliable play clay that can be colored with everyday food coloring - or left white and painted once it hardens. When you have made your model, leave it to air dry - turning every 12 hours or so.
Place ingredients in a pan and stir until smooth. Set the pan over a medium heat and stir until boiling. Stir out any lumps and cook until it is the consistency of mashed potatoes.
Turn out onto a plate and cover with a damp, well-wrung kitchen towel - let cool. Dust a work surface with cornstarch and knead until pliable


Some Tips From our experience!
  • Make early in the morning! It takes a while to cool down!
  • Takes more than 24 hours to dry so do not plan on painting the next day!
  • When turning every 12 hours be CAREFUL! Very fragile and cracks easy!
  • Don't forget to have your kids sign the bottom before drying!

Calming Jars and Reading Time

Today was a day to catch up on rest from the last few days of fun! We implemented a mandatory reading time that I hope to continue if not daily then at least 5 days a week. Everyone picked a book and had 30 minutes of reading, writing and or resting. This was needed as both boys have issues sitting still and reading! It was nice!
We also made Calm Down jars. I mean come on, who cannot use one of these. We saw this idea on pinterest in many places and I think it is a great mediation tool to calm down your overstressed, overwhelmed, overstimulated upset child! I think I need one too!!Some call these time out jars. Really simple! 


Calm Down Jars/Time Out Jars
Things Needed:
Jar
Hot Water
Glitter
Glitter Glue
Food Coloring
Super Glue (to tighten cap after so kids do not open it!) 

Here are your instructions from www.herewearetogether.com and tips below on our experience! 

 1 tablespoon of glitter-glue with about fill with hot water leaving about 1/2 inch from top, then added  food colouring and a tiny tub of glitter.
The glue makes the water so thick and gooey that the glitter just slowly and gently swirls around, it takes 5 minutes to fall to the bottom!

These Photos are from the first set. We plan on making more with pearlized glitter, and in plastic jars. Here are some tips! 


  • Pearlized glitter glue makes all the difference!
    • If you want "swirls" in the colored water, make sure to use some pearlized glitter glue or pearlized paint to color the water.
  • You can not substitute Elmer's glue in place of glitter glue -- it just makes the water all foggy and white and doesn't help suspend the glitter at all.
  • The finer the glitter you use, the better.  
    • Chunky glitter will fall much faster, but finer glitter will stay suspended for quite awhile.
  • Food coloring or liquid watercolors work to color the water.  
  • Leave some room on top but not as much as in the photo! Trial and Error!!! Will Post 2nd set once we get pearlized glitter glue!

Saturday, June 2, 2012

Red Neck Breakfast


Last day at Nana and Poppops! We started out with making our breakfast outside in the beautiful weather! (Started that way!) There is a high fire danger currently in the Colorado mountains so we could not use the fire pit, so we got the Cajun Turkey Fryer base out, grabbed the propane and a big pan! The boys really got into it! Poppop showed them how to make it all and we had ourselves a great breakfast outside!
Then the boys got the jeeps (yes they know they are too big for this but use Callen as an excuse) got their driving course ready and had some fun racing and just being loud! We hit the lake and paddle boated and fished until the rain started coming!!!

Bath time fun is always a mess. I seem to get a bathroom full of water everyday. My 2 year old enjoys bath time and I think enjoys his alone time. We found these ideas on pinterest for sensory tubs and Nana had some different play things in the tub that are great for him.

The first is sand toys. He really enjoyed using a shovel and pail and bubbles . He experimented with different toys and really seemed to enjoy these more than he enjoys the boats and critters! I will be bringing them out at home too!

The 2nd is water balloons! Callen had great fun with these! He liked to rub them on his face. They were cold so he must of liked that. Then after dunking them, throwing them against the wall and bath time was coming to an end I poked a little hole in each one so he did not try to take them out of the bath! That was another 10 minutes of fun! He tried to squirt it in his mouth, squirt me, the dogs, and other toys. He would squeeze them and watch them get big and the water shoot out faster until they broke! GREAT FUN!!! 

Tuesday, May 29, 2012

Melted Crayons


Day 4!! Today was the first day in summer break I really was not feeling great. Of course that meant the boys were extra wild. We started out the day with cartoon in my bed which turned into a wrestling match pretty quickly! We did a few things today including making more shirts for cousins and painting with melted crayons. 


We let Callen paint today and it was cute every swipe he made he had to get my attention and show me looking all proud. Including his face and belly. The boys ran through the sprinklers, had a water balloon fight and this afternoon we rounded up some rocks and crayons and painted! Sounds weird huh?


Gather rocks and put them in the oven at 250 for 5 minutes (don't let them explode!) They get hot so be careful! Take them out one at a time and color on them! It melts it right away looking pretty and bright! I will post pictures tomorrow as I didn't get them on the computer tonight! We placed them around the yard so when we see then we will smile! We also put one in the mailbox for the mailman with a note from Carter thanking him for bringing him his birthday cards. Random act of kindness will bring good karma right!?

Few points on the project! The rocks are hot! But it works best if you color them right away! Smoother finish! Carter used an oven mitt, I just used a paper towel and callen had a rock not heated up!


We liked the smooth rocks better they were easier to do! We also had an hour of computer game time. It was nice and quiet time! Carter likes www.jumpstart.com and Callen loves Thomas the train of course! Both have some educational games on them! 


Goodnight my friends!